Access More Boat Tests
Already have an account? Login
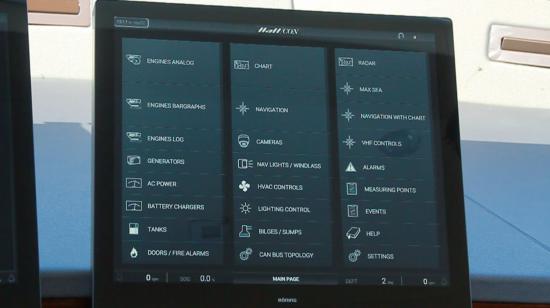
Hatteras HattCON

Overview
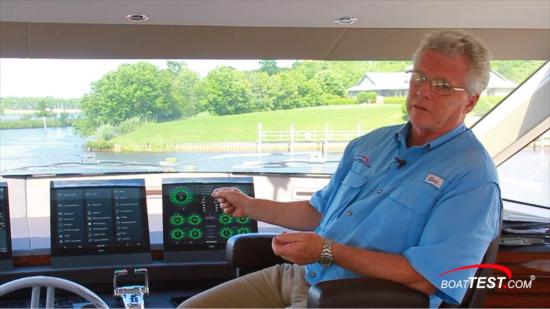
There are a lot of things that are impressive on a Hatteras Yacht but to us, among the most impressive is the HattCON system. This allows an operator to control all of the boat systems and monitor everything from one location. The system also allows for app download, so users can view it on a tablet, smartphone, or even put it on a computer or a laptop at home. The system is designed to work from a home page, that allows the user to get back to the menu and navigate quickly. This may sound familiar to smartphone users.
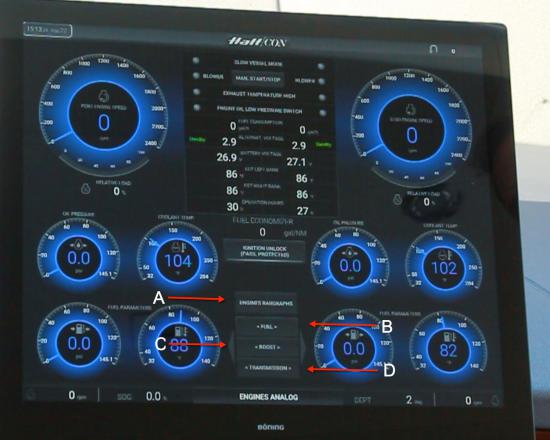
Engine Information Column
On the HattCON Main page, we can start out with the engine information and see the RPM and other critical engine systems. We can also go from fuel, change to the “boost” (Arrow C in the image below) levels on the engines, transmission data, and we can show the same data just by clicking the “engine bar-graph” (Arrow A), but in a different configuration depending on how the operator likes to use the system. Also, from the Homepage we can go to the engine analog, both pages again show the same information.
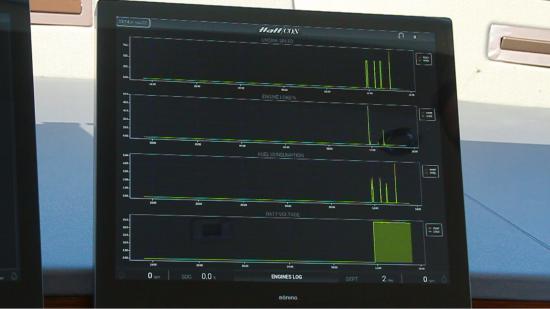
Engine Log
Returning to the main page, we can then look at the Engine log, which is where the system logs various data… from engine load, fuel consumption, battery voltage, etcetera, user-configurable, of course.
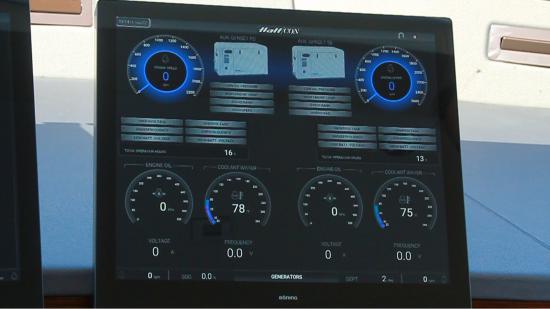
Generators
The Generator page shows all your generator data… rpm, temperatures, etc., with an intuitive system of gray bars that turn red if there is an alarm.
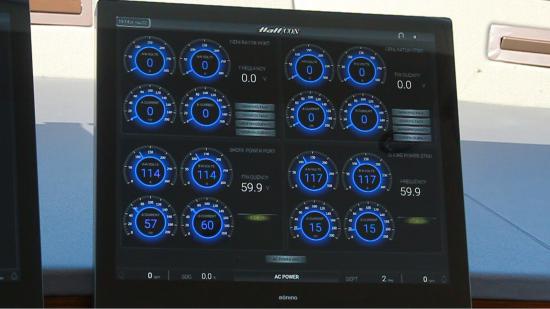
AC Power
If you look at the AC Power Page, we’re running off of the shore power cord, and we can see the flow from either the generator or line voltage current for each one.
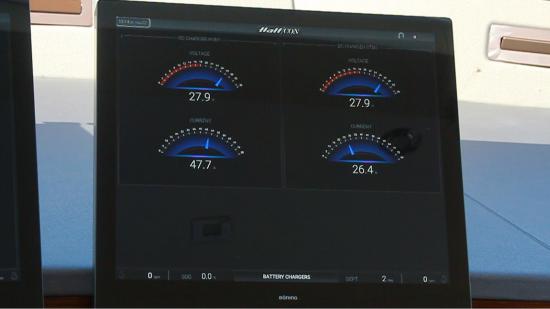
Battery Chargers
Battery Chargers show similar data for the DC system. Both battery chargers independently charge both battery banks, and you see power consumption and voltage levels, along with the amperage levels going to each bank.
Tanks
Below that we can go to the tank page, there is lots of information to show there. We can discharge either our holding tank, or our gray water tank. Since we’re inshore we can discharge only the gray water. Once the button is pressed we will be asked if the valve is open. Click yes, the pump will start running.
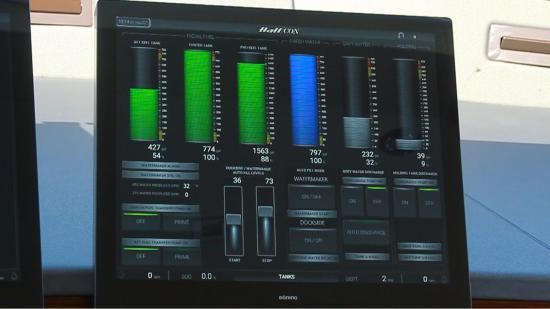
We can also see water tank levels, and fuel tank levels. If we wanted to transfer fuel, we can hold the prime button on the left under “transfer” and once we start transferring, the gray bar will turn green and show we’re actually transferring fuel.
Water-tank levels can be set for automatic fill so that they will start and stop the water maker or the dockside hose.
Doors/Fire Alarms
At the Doors and Fire Alarms page, we can monitor the conditions of all the doors and windows. Had one been open we would get a red label on the “open doors” column and again for the corresponding door in any of the three levels which show as open. This is similar for fire detection and carbon monoxide detection.
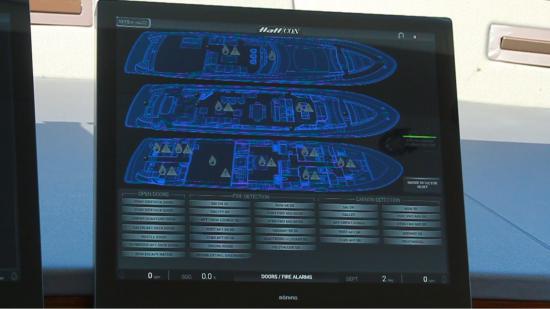
Chart and Navigation Column
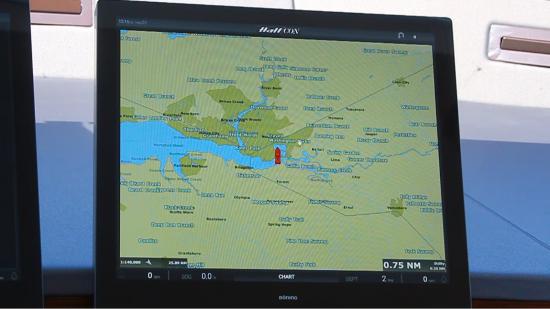
Chart
In the center of the home page is a column of information for accessing chart and navigation pages. These are all slaved to the main navigation suite on board, in this case we’re running MaxSEA software on this yacht. Being a PC-based system, we could run various navigation packages. MaxSEA itself is simply the system this owner chose.
The functionality is all touchscreen with familiar movements such as “pinch to zoom,” and so on. “Find ship” centers the screen back onto where the vessel cursor is. We also have the rotary knob with all its functions also included if you didn’t want to use the touchscreen. The chart, as said before, shows the same data, with a little less information and ribbons because it’s simply a reader. Similarly, the radar page is a slave to the radar software.
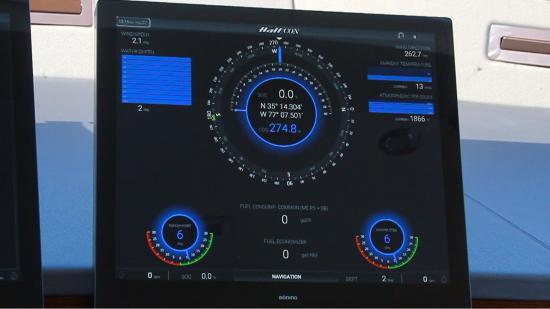
Navigation
Directly below the chart is the navigation page which shows a typical conning display. It shows things such as heading water depth, wind speed, ambient temperature, rudder angles, fuel consumption, and the economy the vessel would get at current speed.
Camera
On the “Camera” page this boat doesn’t have the cameras installed just yet so nothing is displayed, but we’ll have an engine room camera, starboard aft deck, port aft deck, wide angle on the port and starboard side of the boat, and quad splitter so you can see four pages of cameras all in one screen. Full screen mode and a thermal camera, all controlled from the arrow keys below.
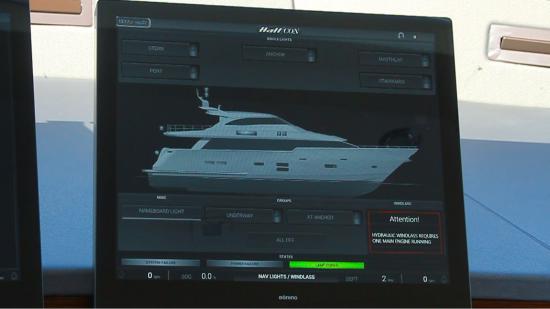
Nav Lights/ Windlass
Going down to the Nav Lights and Windlass button we can select different schemes. For example, “Underway” causes all of the nav lights to show up. If we just do “at anchor” only the anchor light populates. “All off” turns all the lights off.
If the vessel should have any bulb fail, you’ll have a failure alarm. When they’re all functional, lamp power is all green.
Windlass controls are also here, and we saw a fault in this case because the engines are not running. The hydraulics are driven off a power takeoff on the engines, so the hydraulic windlass requirement of one main engine running is displayed.
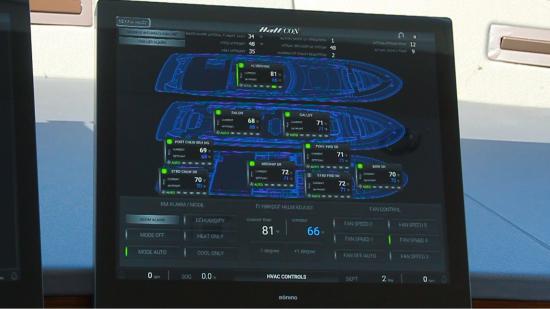
HVAC
HVAC Controls shows a layout with each stateroom and each level of the boat, from flybridge to salon, galley to staterooms. Below each room, there is a slider to control up or down on the temperature control modes, or fan speeds. All configurable here through the touchscreen interface.
We also have chiller information up top, showing return temperature, actual modes, one chiller, variable frequency chiller drives…etc, so it’s a very efficient system and shows critical information to make sure everything’s functioning properly.
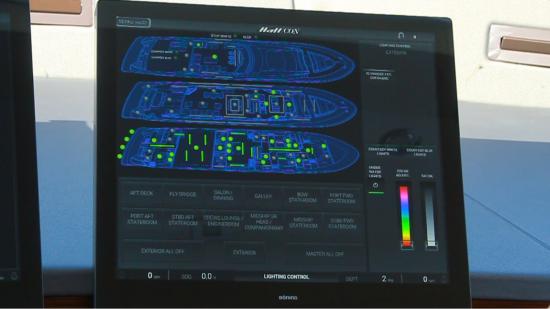
Lighting Control
In the lighting control page we can see all three levels and each stateroom on board. We can go to the salon and dining, and the light circuits will display the change. In the galley we’ve seen the cool changing skylight glass. We can adjust it from dim to dark automatically, and we can also turn the aisle overhead’s lights on. Up in the flybridge, we could turn on and off the shelf lights and soffit lights. We can even dim the overhead lights to a certain preset level that shows while we’re on the page. For the helm lights, at the bottom slider there are red, white, and blue lights. Cycle it and they’ll change to different colors, depending on our visibility requirements at the helm.
“The master All Off” is convenient, and as a secondary safety feature, it requires a passcode if we select it. A four-digit code is entered, to verify that there’s no one else on board, then it turns all the lights off. That way we don’t inadvertently plunge someone into darkness that may be two decks down.
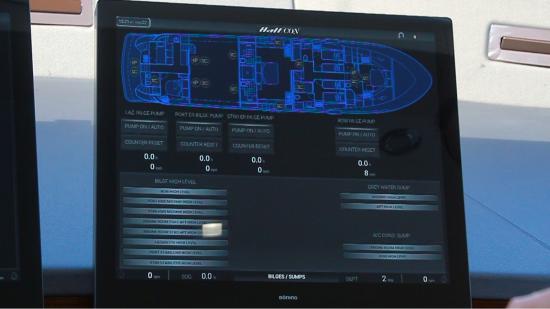
Bilge Pump
The Bilge Pump page shows the lower level of the boat, and we can run bilge pumps from here. We’ll see a bilge pump comes on if the button is touched and a run counter is added. We can also reset the bilge pump counter and it’ll go back to zero. We have gray water, sump alarms, and all the bars that are gray will turn red when there’s an alarm function at present.
Can Bus Topology
The Can Bus Topology shows all the systems on board, and we have very diverse systems. AI Systems, Button panels, cabin con panel displays and blind controls... All of these systems will show to be active and gray, if one has an issue at present it will turn red. All of these are different network devices that are the part of redundancy that comes into the system, and we’ll talk more about that in a little bit.

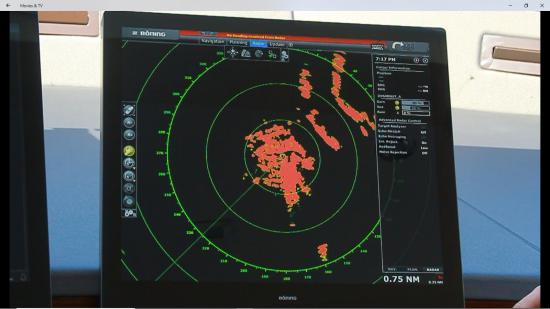
Radar
We showed the radar slave again. We can pinch, zoom, drag control, all with fingertip touch.
MaxSEA
MaxSEA is our navigation package. We touched on this before, pinch-zoom in pinch-zoom out, drag, home center, and you can also scroll out with the side buttons on the left, or the rotary knob.
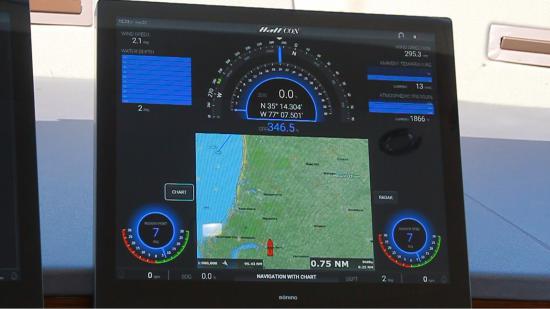
Navigation with Chart
Navigation with chart is like the navigation screen that we showed before. On radar, we can select chart, this shows a lot of more information for navigation; same windspeed direction, atmospheric pressure, rotor angle, water depth, and wind speed, and of course our conning and heading page in the middle.
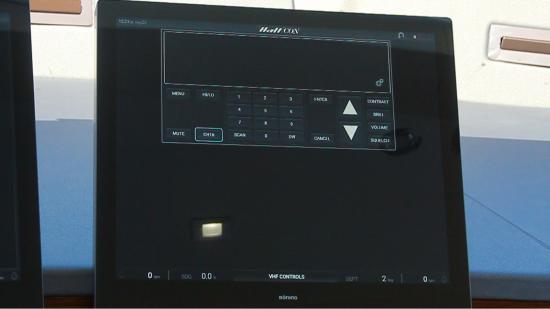
VHF Controls
The VHF controls are digitized for a Furuno VHF. If the VHF is turned on, we could change the channel, mute, menu, squelch…etc. There are two top surface mount VHFs on the helm console, and the Furuno redundancy is underneath the chart flat.
Alarms
The alarm page will show any valid alarm. We can silence or clear an alarm if there were any present.
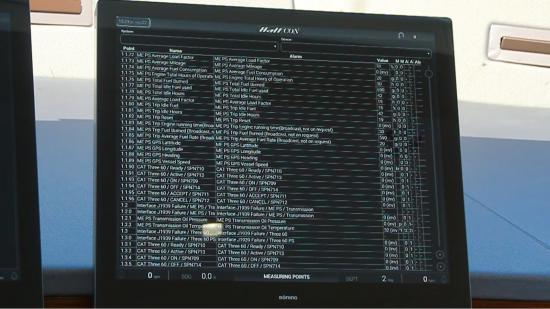
Measuring Points
Measuring points show the system and every feature gets logged, so if any feature is selected, it’ll pop up and give any specific dates, times and what the event was. We can see that in the screen under “Measuring Points.” It’ll log the boat’s data indefinitely until we choose to download the data to a jump drive, and then we can have it for service later or simply to monitor the boat’s progress.
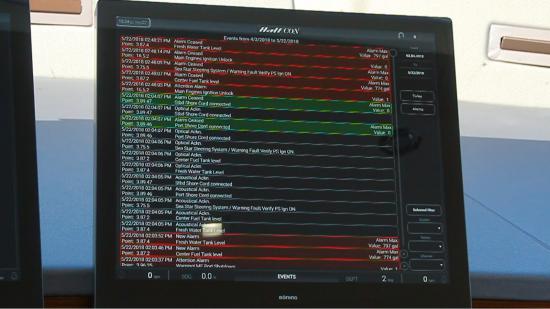
Events
Events have similar information, it’s more up to date and we can cycle through the dates and values of things that happened. For instance, we had an Alarm Ceased for the freshwater tank level, where the value of the water tank level went full, it gave us a notification that the water tank was full, and it was acknowledged.
Help
Help page has the operating systems manual on it. Basically it’s a digitized version of the owner’s manual for the boat.
Settings
The settings page at the very bottom right corner, gives us five different levels of settings, such as setting the “date and time. ” “Device settings” is where we can set the language, show the ID, and configure how we want the screens to display.
“Device information” tells us what the current software and information on board is for update requirements. “Software information” is similar information as to what’s running on the system. “Contact” gives us our direct contact to the plant. “GSM settings” is going to be our text message, so the captain can enter a cell phone and get text messages on board, and we can even see how we have a five-bar signal. “Breakers” show us all of the light system with a list of different breakers on board such as dining, port forward, forward stateroom head, and starboard aft stateroom. Anything that’s green shows us there’s power going to the circuit. “Trip reset” is where tripped breakers can be reset automatically. We can also look at how we can change the color, not only of these displays, but simultaneously change the name board on the side of the boat and underwater lights to match. All with the slider on the bottom left.
Simple is as Simple Does
Now of course there are some people that will say this is a complicated system but it really isn’t. There is an awful lot but it’s all broken down into categories… if you want bilge pumps on just go to bilge pumps and turn the pump on, and of course, the pump goes off automatically because it’s on a float switch. The lighting is also just as simple. If you want to turn on the lights? Go back to the home screen, hit “Navlights” and turn your lights on.
Three Concerns We Had
With a system this complex though, we can’t help but have three concerns; redundancy, stability, and service.
Redundancy
Redundancy is addressed from the fact that there are six solid state PCs connected to the system. One for each screen throughout the boat, and only one is needed working at a time to use any of the functions in the system. There is also redundancy outside of the system, such as turning the lights on by a simple flip of a switch.
Stability
The stability comes from the fact that all of the individual systems maintain the stability on their own. They’re not connected to one another. This means if one system goes down it’s not taking all the other ones with it. They’re all independent systems. Along those lines, it’s important to know that when all those systems come together on the HattCON System, the HattCON system is reading the language of each one of those individual systems. They’re not translating all of their language into HattCON. And that also gives us a good interface with the system. All of the systems have their own interface, such as the MaxSea system being controlled by its own interface by HattCON.
The last concern is service. The capabilities are impressive because this system can be accessed remotely by Hatteras, given that they have the password from the owner. If there is ever a problem with the air cooler, Hatteras can access the system, diagnose it, determine what is wrong, what is needed to fix it, and then send someone out with all of the materials needed to get the system working again. We do not have to wait for it to happen, it is all taken care of remotely through the proprietary system from Hatteras, which is HattCON.